By: [WellZenx Editorial Team]
Published: [01/21/2026]
Scope guardrails (what this article covers)
This guide is for a musty/damp smell that shows up within hours of rain in a typical home (apartment, townhouse, single-family)—and you want a repeatable way to locate the moisture, dry it fast, and prevent mold.
Out of scope (don’t use this guide for these)
Strong “rotten eggs” gas odor or electrical burning smell (treat as safety emergencies)
Floodwater, sewage backup, or contaminated water (special cleanup rules)
Active ceiling collapse, structural rot, or major recurring leaks
30-Second Answer Card
You’ll usually fall into one of these types:
- Type A — Indoor humidity spike: Your indoor RH jumps after rain (common in humid climates or tight homes).
- Type B — Water intrusion leak: Rainwater is getting in (roof, window, siding, foundation, gutters).
- Type C — Hidden wet materials: Something stays damp (carpet pad, drywall edge, basement items), then “re-activates” odors after rain.
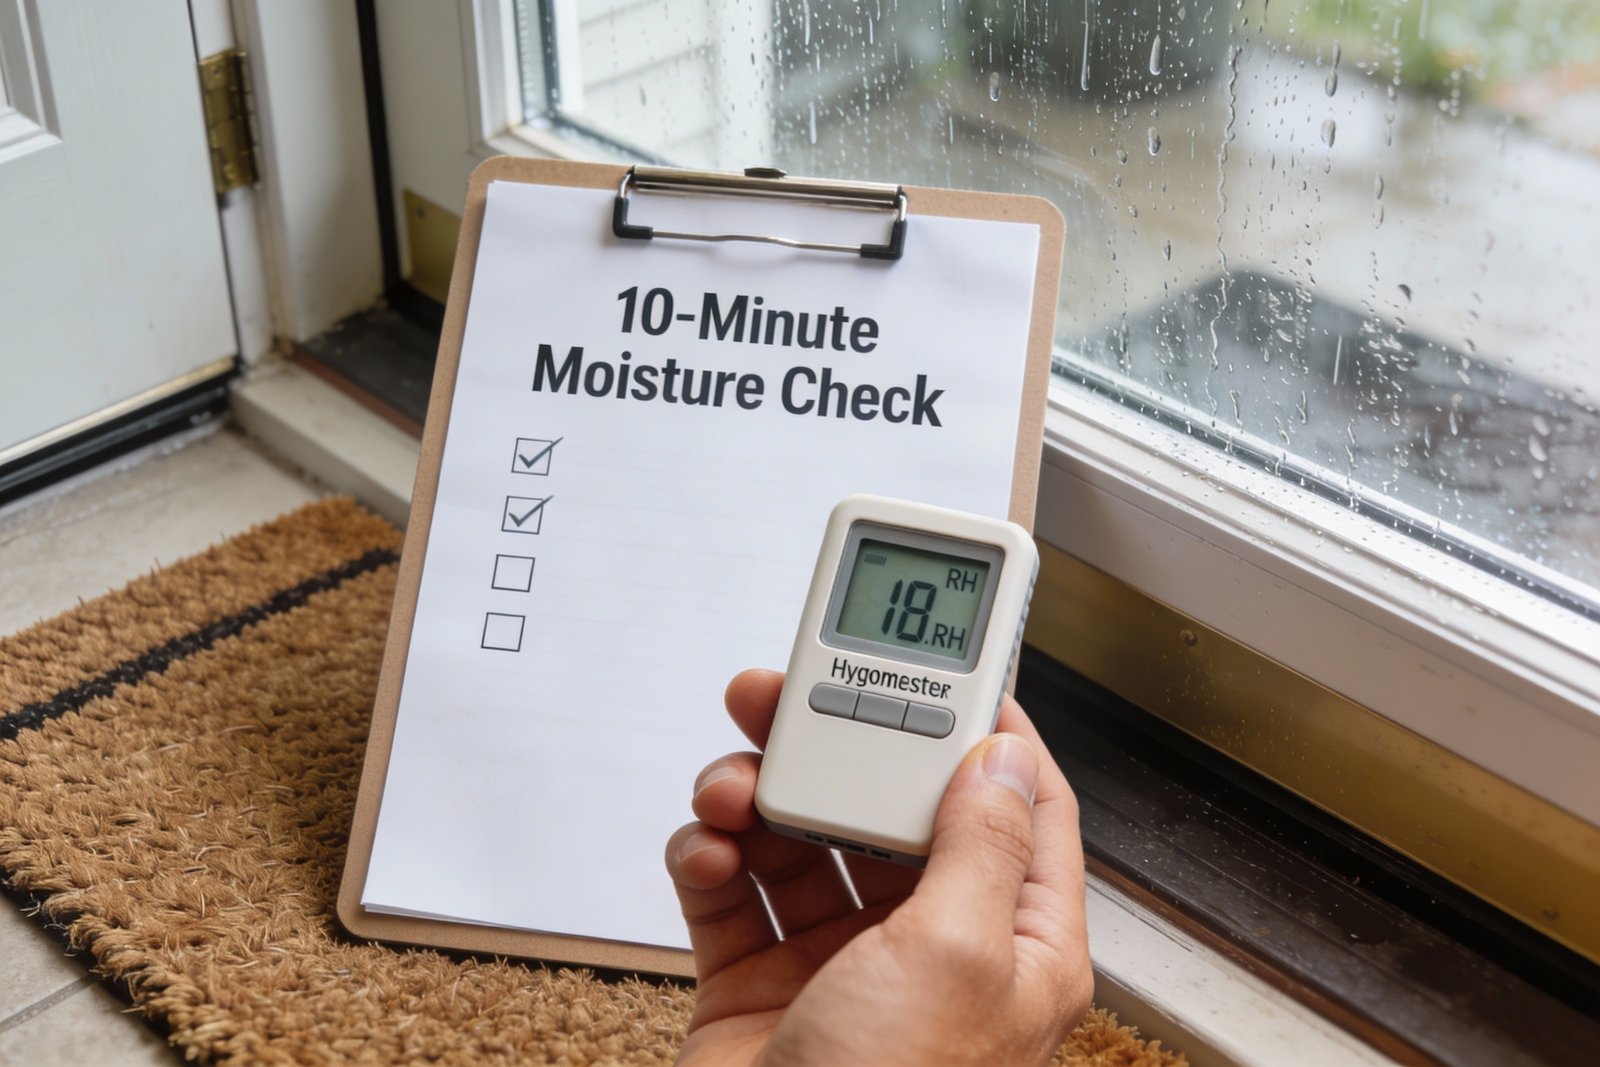
Do these 3 steps first (takes ~10 minutes)
- Measure RH with a basic hygrometer in two spots: the smelliest area + a central hallway.
- Goal: 30–50% RH; red flag: consistently ≥60% RH.
- Find the “wet clue” using a flashlight and a paper towel swipe (baseboards, window trim, basement corners).
- Goal: identify one likely wet zone.
- Start a 48-hour dry-out (fans + AC/dehumidifier + remove wet items).
- Rule: dry wet materials within 24–48 hours to reduce mold risk.
When to escalate
- 48 hours: RH won’t drop below 60% or smell is unchanged → move from “drying” to “find the leak path.”
- 7 days: smell returns after each rain → schedule a focused inspection (roof/window/foundation/drainage).
- 30 days: recurring dampness or visible growth → consider professional moisture/mold evaluation (especially with sensitive occupants).
10-Minute Diagnosis
Minimum tool kit (low cost)
- Hygrometer/thermometer (even a basic one)
- Flashlight
- Paper towels
- Disposable gloves
- Painter’s tape (mark suspect spots)
- Optional: moisture meter (helps, not required)
10-minute self-check (most common → highest risk)
Step 1 — Smell map (1 minute)
Walk the house and pick the strongest smell point. Mark it with painter’s tape: “Smell Zone.”
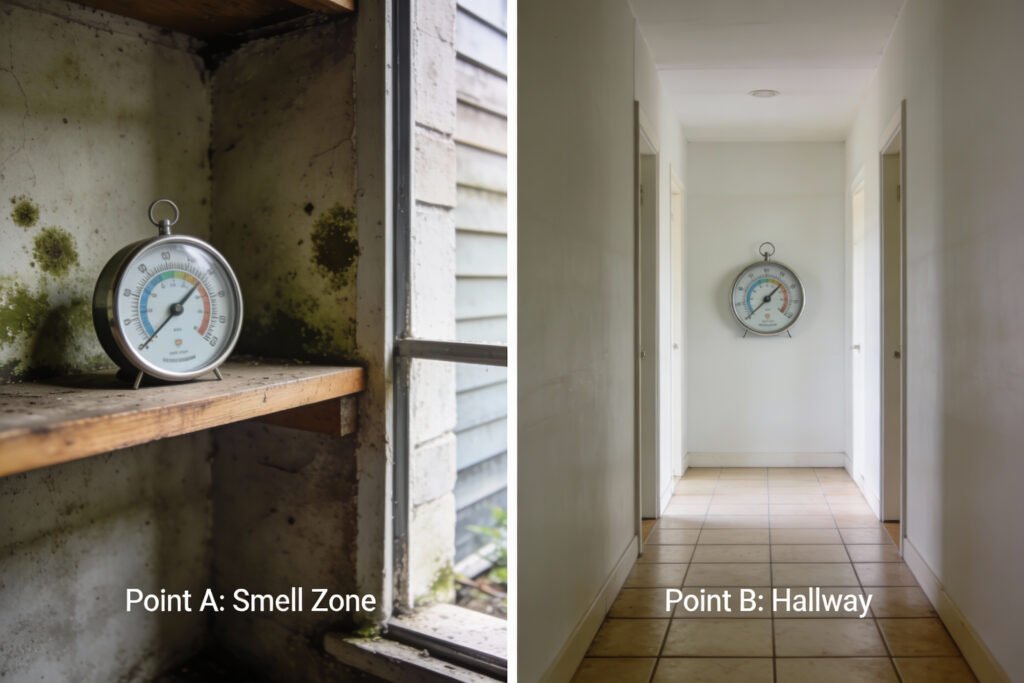
Step 2 — RH check (2 minutes)
Measure RH:
- Point A: Smell Zone (about chest height)
- Point B: Central hallway (same height)
Write down RH and temperature.
Step 3 — Look low first (3 minutes)
Musty after rain often starts low:
- Basement corners, crawl space access door, floor vents, behind sofas against exterior walls
Use the flashlight to look for: - Darkened baseboards, bubbling paint, white powdery residue on masonry, warped trim
Step 4 — Paper towel swipe test (2 minutes)
Wipe:
- Baseboard edges near exterior walls
- Window sill corners
- Basement rim joist area (if accessible)
If the towel comes back damp or dirty-streaked, that’s a priority zone.
Step 5 — “Rain-path” quick check (2 minutes)
Pick one: roof/attic, windows, gutters/downspouts, foundation.
- If smell is upstairs or near a ceiling → check attic/ceiling stains
- If smell is by a window → check lower corners + sill + drywall below
- If smell is basement/crawl space → check seepage lines + sump + perimeter walls
Diagnosis output (choose one)
- If RH ≥60% in both points: you’re most likely Type A (humidity spike).
- If RH is normal but one spot wipes damp / shows staining: you’re most likely Type B (water intrusion).
- If RH is normal but odor is strongest at stored items/carpet/drywall edge: you’re most likely Type C (hidden wet materials).
Root Causes (with proof clues)
Cause 1: Rain-driven humidity spike (Type A)
Why it happens: When it rains, outdoor air can be near-saturated. If that air gets inside (leaky doors, ventilation, frequent opening), indoor RH rises and odors intensify.
Proof clues: RH rises house-wide, not just one corner; smell is “overall damp.”
Verify in 2 minutes: Compare Point A vs Point B. If both high, it’s likely a whole-home moisture load.
Cause 2: Window/door intrusion (Type B)
Why it happens: Wind-driven rain hits frames, flashing gaps, or failed caulk—water runs into the wall cavity and dampens drywall edges or trim.
Proof clues: Dampness below a window, soft drywall near baseboard, paint blistering at corners.
Verify: Paper towel swipe at lower window corners + look for staining under the sill line.
Cause 3: Roof/attic leak that “shows up late” (Type B)
Why it happens: Small roof leaks wet insulation or framing; odor may travel down wall cavities and appear in a bedroom closet or hallway.
Proof clues: Musty smell upstairs after rain, faint ceiling stain, attic insulation clumping.
Verify: Flashlight scan of attic (if safe) near penetrations: vents, chimneys, skylights.
Cause 4: Basement/crawl space moisture + pressure changes (Type B/C)
Why it happens: Rain saturates soil; hydrostatic pressure and drainage issues raise moisture at foundation walls. Crawl spaces can hold damp air that migrates upward.
Proof clues: Smell strongest near basement stairs, closets above crawl space, stored cardboard smells “wet.”
Verify: Check perimeter walls for damp line; measure RH in basement vs upstairs.
Fix Options (ranked)
Option 1 — Stop the moisture source you can confirm (best long-term)
When to use: You found a specific wet clue (stain, damp swipe, recurring spot).
Steps:
- Mark the wet area with tape and date it.
- Check the most likely rain path: gutter overflow, downspout splashback, window corner, roof penetration.
- Fix the obvious first: clear gutters, extend downspouts, re-grade splash zone, reseal a small frame gap.
Pros: Addresses root cause; prevents recurrence.
Cons: May need ladder/contractor; sometimes requires iterative testing.
Cost level: Med–High
Time: 1–7 days
Risk: Med (ladder/roof work—don’t DIY if unsafe)
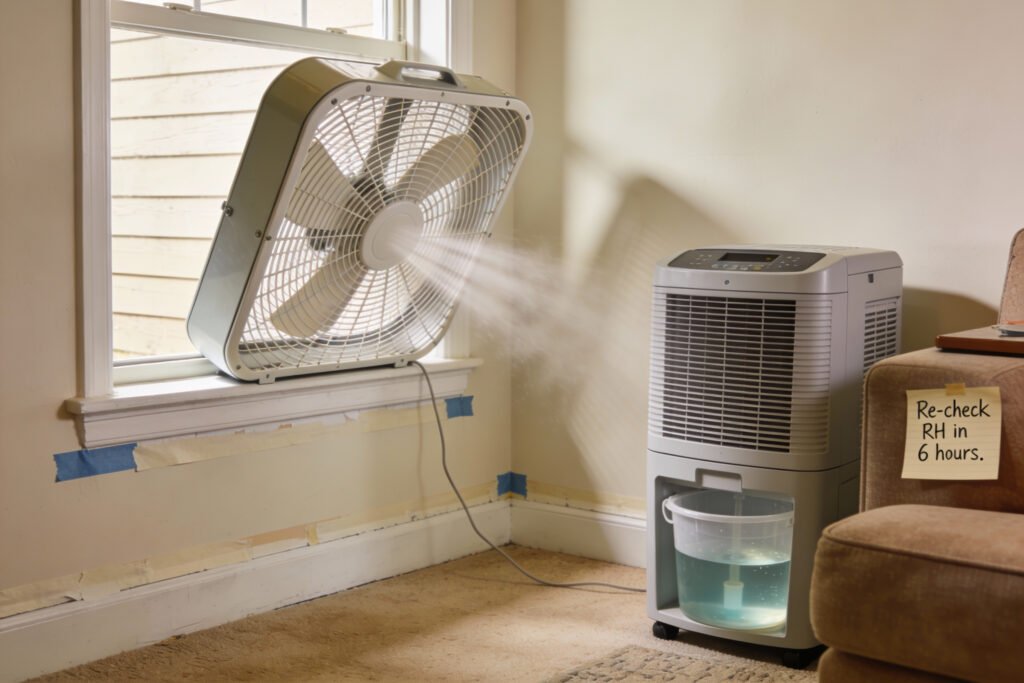
Option 2 — 48-hour dry-out reset (fast relief + reduces mold risk)
When to use: Any type, especially right after rain odor appears.
Steps (48 hours):
- Air movement: Run 1–2 box fans aimed across the damp zone (not straight into a wall).
- Moisture removal: Run AC or a dehumidifier; keep doors to the damp zone open unless isolating a very wet room.
- Remove wet reservoirs: Pull damp rugs, open closet doors, lift items off floors, discard wet cardboard.
- Re-check RH 2–3x/day and log it.
Pros: Immediate improvement; helps you “see what comes back.”
Cons: If a leak continues, smell returns.
Cost level: Low–Med
Time: 2 days
Risk: Low (watch electrical safety around wet floors)
Why 48 hours matters: Drying wet areas within 24–48 hours is widely recommended to reduce mold growth risk.
Option 3 — Whole-home humidity control (Type A)
When to use: RH stays ≥60% across the home after rain.
Steps:
- Set a target: 30–50% RH (try to stay <60%).
- Use AC “dry” mode if available; limit window opening during/after rain; run bath/kitchen exhaust during moisture events.
- If you use a dehumidifier, place it where RH is highest and keep interior doors open for airflow.
Pros: Reduces musty odor triggers; improves comfort.
Cons: Ongoing energy use; may not fix a leak.
Cost level: Med
Time: 2–14 days
Risk: Low
Thresholds used in this article
- Indoor RH target: 30–50% (ideal)
- Indoor RH upper limit: keep below 60%
- Dry-out window: act fast; aim to dry within 24–48 hours
- Escalation: 48 hours no change → hunt leak; 7 days recurring → inspection; 30 days recurring → pro help
(Internal link suggestion: “Site Standard Threshold Guide”)
7-Day Improvement Plan (what to do each day)
Day 1 (Today): Find + dry
- Task: Run the 10-minute diagnosis + start 48-hour dry-out.
- Target: RH trending down; damp swipe area begins to dry.
- Fail = RH unchanged ≥60% or new wet spot appears → move to leak-path checks.
Day 2: Isolate the suspect zone
- Task: Focus fans/dehumidification where the towel test was damp; remove damp items.
- Target: Odor reduced by at least “one level” (subjective scale 1–5).
- Fail: Same odor intensity → check windows/roof/drainage next.
Day 3: Rain-path check (choose one)
- Task: Inspect gutters/downspouts OR window corners OR attic stain scan.
- Target: Identify one “probable entry point.”
- Fail: No clue → consider moisture meter or schedule a targeted inspection.
Day 4: Clean + reset surfaces (only if dry)
- Task: Once dry, clean hard surfaces where odor clings (non-porous).
- Target: No dampness + less “earthy” smell.
- Fail: Any surface still damp → return to drying, don’t “seal over” moisture.
Day 5: Confirm with numbers
- Task: Measure RH morning + evening; log it.
- Target: Stable <60% and trending toward 30–50%.
- Fail: High RH persists → treat as Type A and increase moisture removal.
Day 6: Check hidden reservoirs
- Task: Smell-check closets, carpet edges, stored cardboard, behind furniture.
- Target: Find and remove/relocate the “odor reservoir.”
- Fail: Reservoir is drywall/carpet pad → plan repair/replacement (don’t mask it).
Day 7: Recurrence test
- Task: After the next rain (or simulated with a humid day), re-check the original Smell Zone.
- Target: Smell does not return or returns mild and brief.
- Fail: Smell reliably returns after rain → schedule a professional leak/moisture diagnostic.
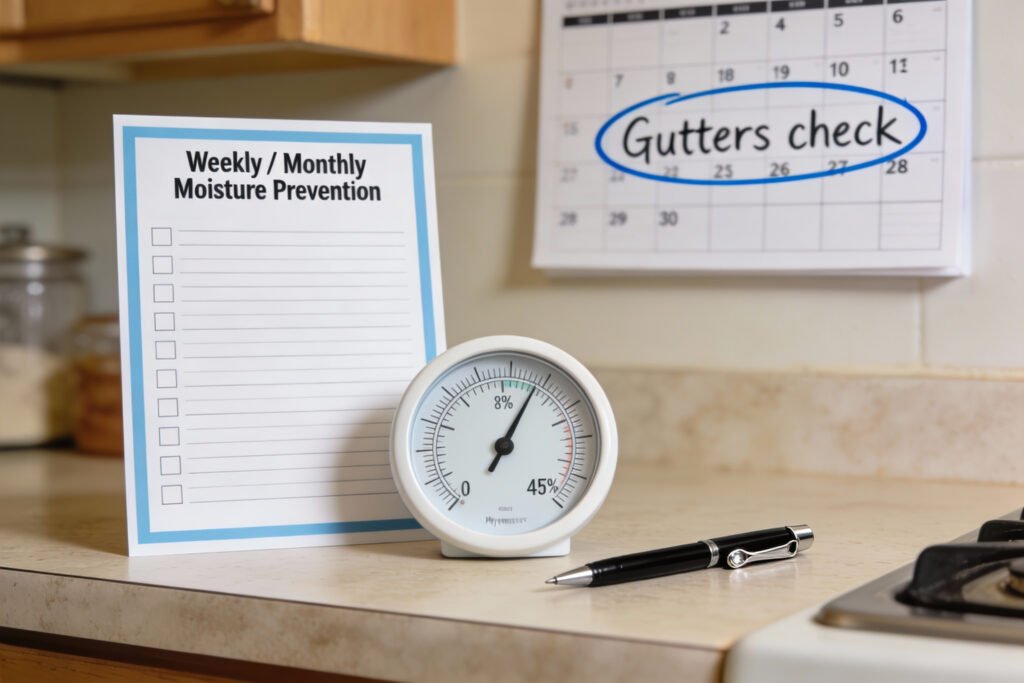
30-Day Relapse Prevention (Weekly / Monthly checklist)
| Frequency | Do this | What to look for | What to record |
|---|---|---|---|
| Weekly | Check RH in 2 spots | RH <60%, ideally 30–50% | RH, temp, weather |
| Weekly | Quick window + baseboard scan | New stains, peeling paint | Location + photo |
| Weekly | Basement/crawl space sniff test | Earthy/wet cardboard smell | Odor level 1–5 |
| Monthly | Gutters/downspouts check | Overflow marks, splashback | Any fixes needed |
| Monthly | HVAC filter + drain line glance | Standing water, clogs | Date changed/cleared |
| Seasonal | “Rainy season” settings | Less window airing during rain | What changed |
Odor Quick-Check (only relevant odors)
| Odor | Check first | Likely cause | Quick test | First 1–2 actions |
|---|---|---|---|---|
| Musty/earthy | Baseboards, closets, basement corners | Damp materials or mild mold | Paper towel swipe + RH log | Start 48h dry-out + remove damp items |
| Wet cardboard | Stored boxes, carpet edge, behind furniture | Hidden damp in porous items | Smell items individually | Discard wet cardboard; elevate storage |
| Sewer-like after heavy rain | Basement drain, floor drain, sink traps | Drain trap issues / backdraft / pressure changes | Pour water into floor drain; sniff test | Refill traps; if persistent, call plumber |
| Electrical “hot” smell | Outlets near damp areas | Moisture + electrical risk | If you suspect it: stop | Shut off power to area; call electrician |
Red Lines: Don’t DIY
- If you see widespread visible growth (large areas, repeated regrowth) → leave the area closed off and call a pro.
- If anyone in the home is high-risk (asthma, severe allergies, immunocompromised, elderly, infants) → avoid exposure; get professional guidance.
- If you smell gas/rotten eggs, feel dizzy, or suspect CO → leave immediately and contact emergency services / your utility.
- If water is near outlets, panels, or wiring → shut off power to that area and call an electrician.
- If there’s sewage backup → do not DIY cleanup—call restoration/plumbing.
FAQ
Q1: How do I know if it’s humidity or a leak?
If RH is high everywhere, it’s usually humidity. If one spot is damp/stained, it’s usually a leak path.
Q2: What RH should I aim for?
Try to keep indoor RH below 60%, ideally 30–50% if possible.
Q3: Why does the smell get worse right after rain?
Rain adds moisture to air and building materials; damp porous materials release “musty” odors more strongly.
Q4: Can I just spray something to cover the smell?
Covering odors doesn’t remove moisture. Dry first, then clean. Otherwise it comes back.
Q5: Do I need a dehumidifier?
If your RH stays ≥60% after rain, moisture removal (AC/dehumidifier) usually helps while you identify root causes.
Q6: When is it “too late” to dry things?
Try to dry wet areas and items within 24–48 hours to reduce mold risk.
Q7: Why does my basement smell first?
Basements and crawl spaces often collect moisture from soil and drainage, especially after rain.
Q8: Should I test the air for mold?
If you can’t find the moisture source, symptoms persist, or there are high-risk occupants, professional evaluation can be helpful.
Author Trust Block
Written by: WellZenx Editorial Team
Reviewed by: Home Environment Standards Editor (WellZenx)
Editorial standards: This article follows our Editorial Policy and fact-checking process.
Why trust this: We base recommendations on widely accepted guidance from sources such as the EPA/CDC and building-science best practices, and we prioritize measurable steps (RH readings, visible moisture clues, dry-out timelines).
Medical disclaimer: This content is for general education and does not replace medical advice.
Last updated: January 21, 2026
Related pages: Editorial Policy • Corrections • Medical Disclaimer • About WellZenx
Sources & Notes (Authority consensus vs Practical tips)
Authority consensus (referenced)
- EPA guidance on keeping indoor RH below 60% (ideally 30–50%).
- EPA mold/moisture guide: act quickly; drying within 24–48 hours reduces mold growth risk.
- CDC mold cleanup tips: dry quickly, within 24–48 hours if possible.
- OSHA safety bulletin: clean and dry wet/damp spots as soon as possible, no more than 48 hours after discovery.
- ASHRAE guidance/FAQ on controlling RH (commonly <65% in occupied spaces).
Practical tips (site workflow suggestions)
- Two-point RH check (smell zone vs central hallway) to separate “whole-home humidity” from “localized intrusion.”
- Paper towel swipe + painter’s tape marking to track whether a “wet clue” is active and recurring.
- Day-by-day plan to force a clear decision: keep drying vs escalate to leak-path inspection.